Configure Windows 10 to Require Confirmation Before Deleting a File
- Posted by
- Posted on December 24, 2019
- Uncategorised
- No Comments.

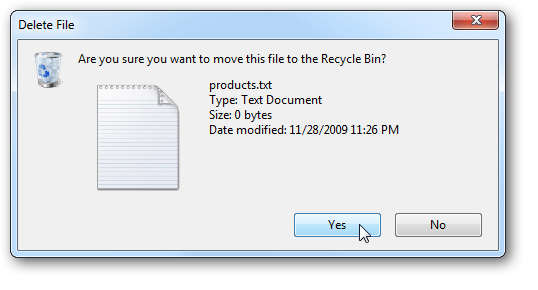
This guide describes how to configure Windows 10, so that you receive a confirmation dialog each time you try and delete a file or folder.
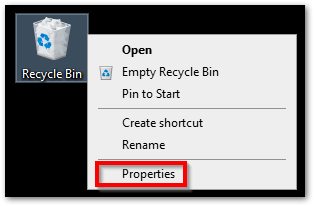
1.) Go to your desktop, right click on the “Recycle Bin”, and select “Properties”
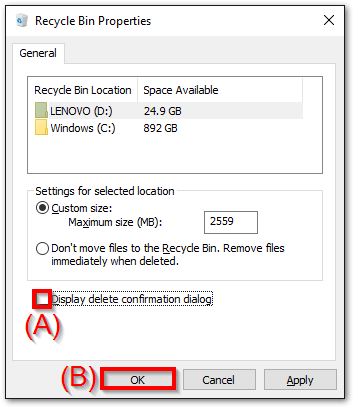
A new window named “Recycle Bin Properties” should open.

2.)
(A) Put a check mark in the box, located next to “Display delete confirmation dialog”.
(B) Click on “OK”.

Recent Posts
- adsiedit.msc vs dsa.msc: Two Active Directory Tools Every Admin Should Understand
- Restore Legacy Print Que in Windows 11
- Windows 11 – Quickly Open the Manual Printer Add Dialog<
- Windows Vista, 7, 8, 10, 11 – GodMode
- Restore the original Windows Photo Viewer in Windows 11
Archives
- December 2025
- October 2025
- September 2025
- August 2025
- July 2025
- June 2025
- February 2025
- January 2025
- January 2021
- May 2020
- February 2020
- December 2019
- August 2019
- January 2019
- July 2018
Categories
- Computers
- IT Support
- Lab
- Linux
- Mac OS
- Management
- Microsoft Applications
- Networking
- Printer
- Router
- Servers
- Switch
- Uncategorised
- Virtualization
- Windows
